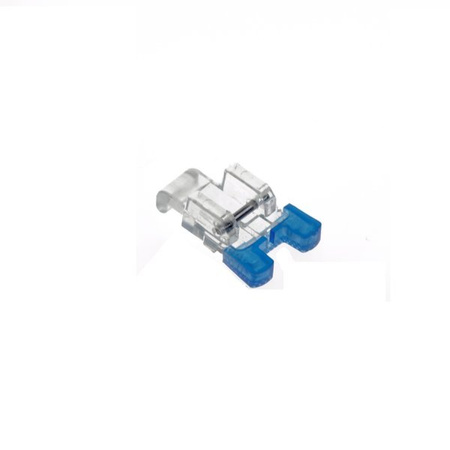
- Specialized foot for sewing on buttons.
Oszczędź kupując więcej

Helena 2060 sewing machine with a set of feet

Helena 2060 sewing machine with a set of feet

Lucznik IVONNE sewing machine with a set of feet

Lucznik SYLVIE sewing machine with a set of feet

Lucznik Mini Blue sewing machine with a set of feet

Patrycja 2090 sewing machine with a set of feet

Patrycja 2090 sewing machine with carrying case, set of thread, needles, feet and bobbins

Helena 2060 sewing machine with a set of feet

Helena 2060 sewing machine with carrying case, set of thread, needles, feet and bobbins

Marilyn 2018 HD sewing machine with foot set

Marilyn 2018 HD sewing machine with carrying case, set of thread, needles, feet and bobbins

Malvina 2070 sewing machine with table and feet

Malvina 2070 sewing machine with table, thread and needles

Helena 2060 sewing machine with a set of feet

Everyday sewing machine with foot and thread set

Patrycja 2090 sewing machine with a set of feet

Patrycja 2090 sewing machine with carrying case, set of thread, needles, feet and bobbins

Lucznik IVONNE sewing machine with a set of feet

Lucznik IVONNE sewing machine with a set of feet

Patrycja 2090 sewing machine with a set of feet
Button sewing foot
Specialized foot for sewing buttons with a sewing machine.
Instructions for use:
Sewing buttons is performed with a zig-zag stitch.
Set the width of the stitch to "0", while the length of the stitch is set according to the spacing of the holes. Turn the handwheel in turns towards each other adjusting the length so that the needle freely penetrates the material between the holes. The needle must not snag or bite into the button.
Always perform test sewing before sewing the actual sewing.
Before sewing a button, turn off or cover the conveyor teeth.
Attach the foot with the blue end facing forward. Put the fabric under the foot with the marked place of sewing the button and the button so that the holes are between the blue tabs in the foot. These tabs are made of rubber, so they firmly hold the button so that it does not move during sewing. After placing the button under the foot, you need to lower the foot using the foot raise and lower lever. Then with the handwheel we need to measure (adjust) the distance between the holes and set the appropriate sewing length. Then you need to sew several times. After sewing the button, the material is removed from under the foot and trim the threads.
When sewing a button with four holes, start with the front holes, and then move to the ones on the back.
If you want to sew a button to a thicker material or a button on a "foot", place a mending needle or a pin on the button, between the holes, and after sewing, pull out a fairly long piece of top thread, which should be circled in the space between the button and the material.
The foot fits:
- lucznik sewing machines with low foot attachment
The foot fits all Lucznik machines from the current sales offer.
The foot is designed for most home sewing machines with MATIC quick-attachment handle. For older machines that do not have a snap-onholder , it is necessary to install it.
Does not fit Lucznik machines: Mini, Lena, Everyday.

